Pho - Vietnamese Soup

Pho - Vietnamese Soup
One of our favorite dishes - Pho

Tuesday, December 27, 2011

Homemade Salsa


The day after Christmas David and I were at it again in the kitchen and made homemade chips and salsa with peppers we grew in our backyard.  Pretty simple and can be done in under an hour. This salsa is good on just about anything.  For homemade tortilla chips, quarter corn tortillas and fry in hot vegetable oil, turning once, until golden.  Drain on some paper towels and salt immediately while still hot.  Muy delicioso!


8 cloves of minced garlic
1 cup of diced red onion
3 cups of diced tomatoes
3 tablespoons of extra virgin olive oil
2 medium chili peppers
4 habanero peppers, seeded
1 cup of distilled white vinegar
2 teaspoons salt
2 teaspoons white sugar

Over medium heat in a large saucepan, heat oil and add the onion, chili peppers, habanero peppers and garlic. Cook for 3 to 4 minutes, or until the onions begin to brown. Stir continuously.

Reduce heat. Add the vinegar, tomatoes, salt and sugar. Stir until the tomatoes break down. Roughly 6 minutes.

Place mixture in blender and blend until a puree is formed.

Pour mixture through a fine mesh sieve.

Let mixture cool for an hour.

Tuesday, December 20, 2011

Chicken Pot Pie


This is comfort food at it's best!  Need I say more?!  =)


Filling:
3 TBSP unsalted butter
1 medium yellow onion, chopped
1 large russet potato, peeled and diced
3 cloves of garlic, minced
6 oz carrots, sliced
4 oz celery, sliced
1/2 tsp red pepper flakes
Salt and freshly ground pepper
1 purchased rotisserie chicken or 2 whole, bone-in chicken breasts roasted
4 oz frozen corn
4 oz frozen peas

1/4 cup chopped, fresh parsley
sometimes I add steamed green beans or snow peas as well

Sauce:
1/2 cup (1 STICK) unsalted butter
1 cup all-purpose flour
2 1/2 cups chicken stock
A dash or two of Frank's Hot Sauce
salt and freshly ground pepper

Crust:
1 Pkg (17.3 ounces/2 sheets) Puff pastry, defrosted or 2 Pillsbury ready made pie crusts

1 egg

To Make The Filling:
Melt the butter in a large saute pan set over medium heat. Add the onion and potato; saute for 5 minutes. Add the garlic, carrots and celery, and saute about 15 minutes, until the potatoes are tender. Stir in the crushed red pepper and add salt and pepper to taste.

While the vegetables are sauteing, skin the chicken, pull the meat off the bones, and shred the meat or cut into bite-size pieces. Stir the peas, corn, parsley and chicken into the vegetable mixture. Set the filling aside.

To Make The Sauce:
Melt the butter over medium heat in a large saucepan. Add the flour and whisk until smooth. Whisk in the chicken stock and cook the sauce over medium heat until it thickens to the consistency of a cream soup. Add the hot pepper sauce, salt and pepper to taste. Pour the sauce over the chicken filling and stir to combine.  Set aside.

To Make The Crust:
Preheat the oven to 375 degrees F.  Unfold a sheet of puff pastry or pie crust on a lightly floured surface. Use a floured rolling pin to roll the dough out slightly. Measure the diameter of the pot pie bowls, and cut out dough rounds that are slightly larger in diameter. Repeat with the second pastry sheet to make 8 circles in all for 4 pot pies.  
Place one dough round in each individual 1 1/4-cup capacity oven-safe bowl or aluminum tin, pressing dough onto the bottom and sides.  Add creamed chicken filling three-quarters of the way to the top.  Lay the remaining dough rounds on top of the pot pies.  Whisk the egg in a small bowl.  Brush the dough lightly with the beaten egg. Bake the pies for 45 minutes to an hour, until golden brown. Serve immediately.

**You can freeze any leftover pies and/or filling for up to 6 months for a quick fix dinner.

Sunday, December 18, 2011

Chocolate Truffles


I've been wanting to try to make homemade chocolate truffles ever since I saw Ina Garten's, aka "The Barefoot Contessa" feature them on one of her shows.  They were fairly easy to make and decadently delicious.  These will make great gifts for the holidays.


1/2 pound good bittersweet chocolate such as Lindt
1/2 pound good semisweet chocolate such as Ghiradelli
1 cup heavy cream
2 tablespoons Grand Marnier, optional
1 tablespoon prepared coffee
1/2 teaspoon good vanilla extract
Confectioners' sugar
Cocoa powder

Chop the chocolates finely with a sharp knife. Place them in a heat-proof mixing bowl.

Heat the cream in a small saucepan until it just boils. Turn off the heat and allow the cream to sit for 20 seconds. Pour the cream through a fine-meshed sieve into the bowl with chocolate. With a wire whisk, slowly stir the cream and chocolates together until the chocolate is completely melted. Whisk in the Grand Marnier, if using, coffee, and vanilla. Refrigerate for at least 1 hour.

With 2 teaspoons, spoon round balls of the chocolate mixture onto a baking sheet lined with parchment paper. Refrigerate for at least an hour or until firm.  Roll each dollop of chocolate in your hands to roughly make a round ball. Roll in confectioners' sugar, cocoa powder, or both. These will keep refrigerated for weeks, but serve at room temperature. 

Friday, December 16, 2011

Danish Roast Pork, Potatoes and Red Cabbage with Apples


This is a beautiful, hearty, simple "go-to" dish for the holidays.  Foolproof and inexpensive, anyone can pull off this delightful feast.  I do have a few pointers though...when making the compound butter be sure you grate the onion over the butter so that you get all the juices from the onion, because that adds an incredible amount of flavor.  In this recipe you cut the potatoes in half and cook them on the stove in the roasting pan on one side until golden brown (more golden than pictured above).  Then you flip them and let the other potato halves slow roast under the pork, soaking up all the compound butter and wine.  The potatoes turn out nice and juicy from all the juices on one side and good and crispy on the other.  About a half hour into cooking the pork roast start on the red cabbage and apple side dish.  It couldn't be easier to make and is the perfect accompaniment to the roast pork and potatoes.  Happy cooking and Happy Holidays!  =)


This recipe is adapted from Rachael Ray's.


1 stick butter, softened
1/2 cup grated onion, 1 small
1 tsp dried marjoram, lightly crushed
1 tsp ground sage
2 TBSP olive oil
3 lbs medium white-skinned potatoes
1 cup dry white wine or chicken stock
Salt and pepper
1 3- to 4-pound pork loin roast
1 medium red cabbage
2 crisp apples, chopped
Freshly grated nutmeg
1 cup cloudy apple cider
1/2 cup cider vinegar
1 round TBSP light brown sugar
1 1/2 tsp caraway seed, half a palmful


Heat oven to 350°F.

Combine butter with onion, marjoram and sage.

Heat a metal roasting pan on the stove over medium high heat with 2 turns of the pan of olive oil, about 2 tablespoons. Halve potatoes and place cut-side down in the hot pan. Cook until golden brown, flip and turn off the heat. Add the wine or stock to the potatoes and season with salt and pepper.

Rub pork with flavored butter and aggressively season with salt and pepper. Arrange the pork over the potatoes and dot with remaining butter. Roast about 1 hour and 30 minutes until the internal temperature reaches 145°F on a meat thermometer.

Meanwhile, shred the cabbage and add to a large covered pot with the apples. Season with salt, pepper and a little nutmeg. Add cider, vinegar, sugar and caraway; bring to a boil then reduce heat to simmer. Cook covered for 1 hour, stirring occasionally.

Slice pork and serve with potatoes and cabbage alongside.

Tuesday, December 13, 2011

N Cuisine in Lakewood Shopping Center


David and I had a really nice lunch last week at a funky and eclectic little Greek bistro called "N Cuisine" in Lakewood Shopping Center in Dallas...just a few doors down from Dixie House.  Delicious food, all organically made with the freshest of ingredients.  The menu ranges from all the classic Greek dishes, such as beef, chicken or lamb gyros, to pita pizzas, to soups and salads and sugarless desserts including baklava, pumpkin cookies and chocolate truffles, to name a few.  It's also a quaint tea/coffee house and they serve brunch during the weekends and even have live music on Friday nights, which we look forward to checking out soon.  


Gino Nikolini is the proprietor and chef of "N Cuisine" and takes great pride in the healthy foods he serves, as well he should.  He's a 64 year old Greek hippie that has traveled the world and after changing his lifestyle and losing a bunch of weight has committed himself to a healthier way of life for many years now.  It shows in how he looks and feels and in the passion he has for his food and restaurant.  After serving us a side of Greek cole slaw complete with black olives and pomegranate seeds, Gino explained to us if you eat at least 4 black olives per day that that will help improve one's memory.  I bought an abundance of black olives the very next day...I'll let ya'll know if it helps.  ;-)


The gyros were truly some of the BEST in town.  Their meats are raised in Vail, CO and are 100% organic.  The gyros are served traditionally in a cone shape wrapped in wax paper and foil topped with Greek yogurt and a little spice.  On the side, were lightly roasted potatoes and salad.  The truffles we were served for dessert were rich and decadently delicious and they didn't have a bit of cream, butter, sugar or salt and you would never know it.   "N Cuisine" is a well kept secret that's worth knowing about.  You may not know it's a restaurant just by walking past, but it's definitely worth stopping in for a bit.  


BTW, if you haven't already, be sure and check out our version of a Gyro...It's not quite as authentic and healthy as Gino's, but it's a good homemade contender.  Go check out "N Cuisine" and I promise you will be glad you did and be sure and tell Gino that the McQuaids sent you.  Opa!


Monday, December 12, 2011

Chicken Enchiladas


Although these aren't true Mexican enchiladas because the recipe calls for flour tortillas as opposed to corn, these still turned out very good with great flavors.  You can make this recipe super easy and substitute the homemade salsa with a good, thick and chunky, store-bought salsa like Pace Picante Sauce.  Be careful with whatever salsa you do use that it's not too watery or the tortillas will get mushy.  With a little tweaking these were delicioso!

Recipe is adapted from the Food Network's Ingrid Hoffmann.


PS  Again, I don't understand why there are all of these unintentional gaps in my posts.  Blogger what's up with that?

Salsa:

2 (14-ounce) can diced tomatoes with chiles, drained
1 bunch scallions, light green and white parts only, finely chopped
4 jalapenos, seeded, deveined, and finely chopped
1/2 cup finely chopped cilantro leaves
1 lime, juiced and zest
Pinch salt

Enchiladas:

1 rotisserie chicken, meat removed and shredded (skin and bones discarded)
3 cups grated Cheddar, divided
1 cup sour cream
1 small red onion, finely chopped
1 TBSP butter
1 package Fajita Seasoning Mix
1 tsp cumin
Salt and freshly ground black pepper
6 - 8 (8") flour tortillas

To prepare the salsa:

Combine the tomatoes, scallions, jalapeno, cilantro, and lime juice in a mixing bowl. Add a healthy pinch of salt and set aside at room temperature until ready to cook the enchiladas.

Preheat your oven to 350 degrees F. Spray a 9 by 13-inch baking dish with nonstick cooking spray.

To prepare the enchiladas:

In a pan saute' the onion in butter until translucent.  Place the shredded chicken in a large bowl. Add 1 cup of the grated cheese, sour cream, onion, Fajita seasoning and cumin; season with salt and pepper. Mix well to combine.

Place the tortillas on your work surface. Spoon about 1 cup of the chicken mixture across the center of each tortilla. Roll them up to close and place, seam side down, in the prepared baking dish. Pour the salsa over the tortillas. Cover with aluminum foil and bake until heated through, about 40 minutes.

Remove the foil and sprinkle the enchiladas with the remaining 2 cups of grated cheese. Return the baking dish to the oven until the cheese is melted and edges of the tortillas are just beginning to get crisp, 5 to 8 minutes. Serve hot.


Sunday, December 11, 2011

Ninfa's Green Sauce


Here's another classic recipe I came across in Lisa Fain's "The Homesick Texan's" cookbook.  I used to eat at Ninfa's all the time when I worked close to one of their Dallas locations way back when.  I especially enjoyed their green sauce and their tacos al carbon is another favorite, which that recipe I've also found in "The Homesick Texan's" cookbook.  So, you can count on me cooking that up soon and blogging all about it as well.  Lisa and I have very similar tastes in the food we enjoy.  I've thoroughly enjoyed her new cookbook and I've said it before, her book would be a wonderful Christmas gift for the foodie in your life.


3 medium-sized green tomatoes, coarsely chopped (you can substitute yellow if you can’t find green ones, but never use red)
4 tomatillos, cleaned and chopped
1 to 2 jalapenos, stemmed and coarsely chopped
3 small garlic cloves
3 medium-sized ripe avocados, peeled, pitted and sliced
4 sprigs cilantro
1 tsp. of salt
1 1/2 cups of sour cream

Method:
Combine chopped tomatoes, tomatillos, jalapenos and garlic in a saucepan. Bring to a boil (tomatoes provide the liquid), reduce heat and simmer 10 to 15 minutes.
Remove from heat and let cool slightly.
Place tomato mixture with the avocados, cilantro and salt in food processor or blender and blend until smooth.
Pour into a bowl and stir in sour cream.

Makes 4 to 5 cups

Saturday, December 10, 2011

French Dip Brisket Sandwiches


I saw this on Rachael Ray's website and being very fond of foods cooked in a slow cooker it was another one of her recipes I had to try.  This dish turned out better than I could've hoped for, with the meat cooked to slow perfection.  I did alter the recipe just a bit, I doubled the amount of garlic, beef stock and Worcestershire than what's called for here.  The meat turned out super tender and juicy and very easy to shred.  I find shredding the meat with my hands helps gets the fat out easier and makes the meat just right for a hoagie-style sandwich.  Rachael actually dips her entire toasted bun into the leftover juices...that's a little much for me as I like my "au jus" to be served on the side with a touch poured over my meat.  I don't like my sandwiches to be soggy, I like to dip my sandwich into the juice one bite at a time.  Such an incredibly easy dish to serve for a large crowd.  It's the perfect recipe for a tailgating contribution or as I'm doing tonight, I'm slow cooking this brisket for a hearty meal to serve while watching our beloved Cowboys kick the New York Giant's butts tonight!  GO COWBOYS!!!  =)


1 tablespoon EVOO – Extra Virgin Olive Oil
4 slices smoky bacon, chopped
Salt and pepper
1 3-pound beef brisket
1 large onion, thinly sliced
2 to 3 cloves garlic, finely chopped or grated
1 bay leaf
1 box or 1/2 pound cremini mushrooms, wiped clean and quartered
2 TBSP Worcestershire sauce
2 cups beef stock or broth
2 TBSP fresh thyme, chopped
2 TBSP honey

To serve:


1 loaf bread, cut into 4-inch sections, split and toasted
Sliced Swiss cheese
Chopped Italian flat-leaf parsley

Place a large skillet over medium heat with 1 turn of the pan of EVOO, about 1 tablespoon. Add the bacon to the pan and cook until golden brown, about 5 minutes. Remove the bacon from the pan with a slotted spoon and reserve on a paper towel-lined plate to drain.
Return the skillet to medium-high heat with the bacon fat. Season both sides of the brisket with salt and pepper, and sear on all sides until golden brown, 3-4 minutes per side.

While the meat is searing, add the reserved bacon, onion, garlic, bay leaf, mushrooms, beef stock or broth, thyme, Worcestershire sauce and honey to the crock of a slow cooker. Season with salt and pepper, and stir to combine. Add the seared meat to the pot and cover. Cook on high for 5 hours or low for 7-8 hours until the meat is tender.
Thinly slice the brisket. To serve, dunk bread into sauce, and top with brisket, Swiss cheese, cooked veggies, more juice, and parsley.


**As a side note, another use of the brisket is this makes for excellent authentic brisket tacos.  Serve topped with cilantro, diced onion, lime wedges and your favorite red and green sauce.  Reminiscent of 

Wednesday, December 7, 2011

Pumpkin Gooey Butter Cakes


With Thanksgiving having just come and gone I tried a new recipe that everyone loved.  Cassidy is especially a fan of pumpkin pie, so in addition to the annual pumpkin pies I make, this year I thought I'd switch it up a bit after seeing Paula Deen's recipe for Pumpkin Gooey Butter Cakes.  These were so moist and fluffy, very similar to a cheesecake and absolutely delish!  David, who is not a big pumpkin fan (other than his yummy, roasted pumpkin seeds) loved this and suggested I make this instead of my pies.  Also, this recipe is super easy, it serves quite a few folks and is another one that makes the house smell heavenly.  This would be a good dessert to serve after any big holiday feast.


Thank you to Cassidy for the beautiful pictures.  That was fun setting that all up with you in the wee hours.  =)


Crust:


1 (18 1/4-ounce) package yellow cake mix
1 egg
8 TBS butter, melted

Filling:

1 (8-ounce) package cream cheese, softened
1 (15-ounce) can pumpkin
3 eggs

1 tsp vanilla
8 TBSP butter, melted
1 (16-ounce) box powdered sugar
1 tsp cinnamon
1 tsp nutmeg

fresh whipped cream to top

Preheat oven to 350 degrees F.

Combine the cake mix, egg, and butter and mix well with an electric mixer. Pat the mixture into the bottom of a lightly greased 13 by 9-inch baking pan.

To make the filling: In a large bowl, beat the cream cheese and pumpkin until smooth. Add the eggs, vanilla, and butter, and beat together. Next, add the powdered sugar, cinnamon, nutmeg, and mix well. Spread pumpkin mixture over cake batter and bake for 40 to 50 minutes. Make sure not to over bake as the center should be a little gooey.

Serve with fresh whipped cream.

Variations: For a Pineapple Gooey Cake: Instead of the pumpkin, add a drained 20-ounce can of crushed pineapple to the cream cheese filling. Proceed as directed above.

For a Banana Gooey Cake: Prepare cream cheese filling as directed, beating in 2 ripe bananas instead of the pumpkin. Proceed as directed above.

For a Peanut Butter Gooey Cake: Use a chocolate cake mix. Add 1 cup creamy peanut butter to the cream cheese filling instead of the pumpkin. Proceed as directed above.


*This recipe adapted from the great Paula Deen.


Sunday, November 20, 2011

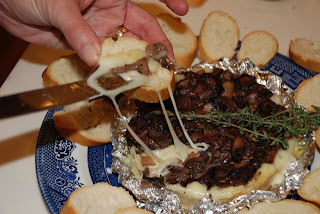
Baked Brie with Mushrooms and Thyme


The McQuaid clan are all big fans of brie, especially when baked and in it's true ooey-gooey goodness state!  When I ran across this recipe I couldn't resist and knew it would be a hit.  Perfect for a rainy, Sunday afternoon while watching the Cowboys destroy the Redskins!  GO COWBOYS!!!  =)


This recipe is easy to make, although it has several steps, but none of them are difficult. I served the brie in the box on a nest of crumpled foil as suggested and it made the clean-up easier and made for a nice presentation as well.  I would give this recipe five stars...We all loved it.


Here's the recipe that's adapted from Bon Appetite Magazine:


1/2 ounce dried porcini mushrooms*
2/3 cup dry red wine
2 tablespoons (1/4 stick) butter
6 ounces crimini (baby bella) mushrooms, halved or quartered if large
6 ounces shiitake mushrooms, stemmed, sliced
2 tablespoons minced shallot (about 1 large)
2 teaspoons chopped fresh thyme
1 13- to 14-ounce Brie (about 5 inches in diameter; preferably in wooden box)
1 baguette, cut into 1/4-inch-thick slices

Rinse dried porcini to remove any grit. Place porcini and wine in small saucepan. Bring to simmer over low heat; remove from heat. Let soak until soft, about 20 minutes. Using slotted spoon, transfer porcini to work surface and coarsely chop. Line strainer with damp paper towel; strain wine into small bowl and reserve.
Melt butter in heavy large skillet over medium-high heat. Add crimini and shiitakes. Sprinkle with salt and pepper and cook until brown, stirring occasionally, about 8 minutes. Add shallot and stir until soft, about 1 minute. Add chopped porcini and strained wine. Boil until almost dry, about 1 minute. Stir in thyme. Season to taste with salt and pepper. Cool.

Remove Brie from box, discarding lid and paper. Using sharp knife, cut top rind from Brie; discard. Return Brie to box. (Alternatively, stack two 12-inch rounds of foil and fold up around bottom and sides of Brie, crimping foil at edges, leaving top exposed.) Mound mushroom mixture atop Brie. DO AHEAD Can be made 8 hours ahead. Cover and chill. Bring to room temperature before continuing.
Preheat oven to 350°F. Place Brie with mushrooms on rimmed baking sheet. Bake until cheese begins to melt and mushrooms are warmed through, about 15 minutes.

Transfer Brie in box to plate. Serve hot with baguette slices.

*Available in the produce section of many supermarkets and at specialty foods stores and Italian markets.
test-kitchen TIP

To cut the top off the round of Brie more easily, first place the cheese in the freezer for a few minutes to firm it up slightly.

Thursday, November 17, 2011

Apple Crumb Pie


In honor of fall I couldn't wait to make an apple pie or an apple crisp.  During my research process I ran across Paula Deen's recipe that was a lovely combination of both.  I did tweak her recipe a bit after reading the reviews.  Her recipe calls for twice as much applesauce and half of the crunch topping that I used.  With a few minor adjustments, this apple pie/crisp topped with vanilla ice cream is American cuisine at it's BEST!!  


Here's my tweaked version of Paula's recipe:


Dough and Filling:

Dough for a double crust 9-inch pie (homemade, frozen, or refrigerated)
3/4 cup sugar
1 TBSP all-purpose flour

1 tsp ground cinnamon
Dash salt
3 1/2 cups peeled, chopped granny smith green apples
1/2 cup applesauce
1 TBSP lemon juice
2 TBSP butter, chopped into small pieces

Crunch Topping:

6 TBSP all-purpose flour
2 TBSP sugar
Dash or two of salt
2 TBSP butter, at room temperature
1 tsp cinnamon


Preheat oven to 425 degrees.

Line a 9-inch pie pan with half of dough. Combine sugar, flour, cinnamon, and salt in a bowl. Stir in apples, applesauce, and lemon juice. Spoon apple mixture into pie pan and dot with butter. Cut remaining crust into strips; arrange in a lattice design over top of pie. For crunch topping, combine flour, sugar, salt and cinnamon in a bowl. Using a fork, cut in butter until mixture is crumbly. Sprinkle over top of crust. Bake for 10 minutes, then reduce heat to 350 degrees and continue to bake for about 45 minutes, or until crust and topping are golden brown.  Top with vanilla ice cream.


Paula's Perfect Pie Crust


2 1/2 cups all-purpose flour
1/4 tsp fine salt
3 TBSP granulated white sugar
1/4 cup vegetable shortening, cold
12 TBSP butter, cold and cubed
1/4 cup to 1/2 cup ice water

In a large mixing bowl, sift together the flour, salt and sugar. Add the shortening and break it up with your hands as you start to coat it all up with the flour. Add the cold butter cubes and work it into the flour with your hands or a pastry cutter. Work it quickly, so the butter doesn't get too soft, until the mixture is crumbly, like very coarse cornmeal. Add the ice water, a little at a time, until the mixture comes together forming a dough. Bring the dough together into a ball.

When it comes together stop working it otherwise the dough will get over-worked and tough. Divide the dough in half and flatten it slightly to form a disk shape. Wrap each disk in plastic and chill in the refrigerator for about 30 minutes. On a floured surface roll each disk out into a 10 to 11-inch circle to make a 9-inch pie.

Thursday, November 10, 2011

Roasted Butternut Squash Soup


If you love butternut squash soup you will appreciate this recipe.  I made this for Halloween night and it made the house smell divine.  This soup has complex flavors, with a little heat and a lot of sweet.  The squash and toasted spice mixture took some time to make, but now that I have extra spice mix, it will be much easier to make next time.  

Don't toss out the seeds from the squash.  After scraping them out, I rinsed them, dried them on paper towels, tossed them with about a 1 teaspoon or so of butter, sprinkled them with a tiny bit of the rub, then roasted them in a 350 degree oven for about 15 minutes, stirring occasionally.  Sprinkle with sea salt.  Tasty on their own or sprinkled on the soup. 

I have to admit I'm not a big fan because the soup is a little too sweet for my liking.  When making again I will use a little less molasses to help cut down on the sweetness.  Cassidy who loves anything made with pumpkin or squash can't wait for me to make this again.  Overall, though, a great recipe that received rave reviews from family and friends who gobbled this rich soup up on a cold Halloween night.

This recipe is adapted from Michael Chiarello's.  Be sure and check out Michael's serving  suggestions after the roasted squash recipe.  


2 TBSP extra-virgin olive oil
1/2 cup (1/4-inch) diced onion
1/4 cup (1/4-inch) diced celery
1/4 cup (1/4-inch) diced carrot
1 cinnamon stick
Sea salt, preferably gray salt
Freshly ground black pepper
About 4 cups chicken stock or canned low-salt chicken broth
1/2 tsp ground toasted coriander, optional
1 1/2 cups Roasted Winter Squash (recipe follows)
1/2 cup half-and-half, optional
1/4 cup mascarpone cheese, optional
2 TBSP toasted pumpkin seeds, optional

Heat the olive oil in a large saucepan over medium heat until hot. Add the onion, celery, carrot, and cinnamon stick and saute until soft but not brown, about 10 minutes. Season with salt and pepper.

Add the chicken stock and the coriander, if using, and bring to a boil. Simmer for several minutes. Stir in the squash until smooth, then simmer gently to let the flavors meld, about 10 minutes. Discard the cinnamon stick.

Puree the soup in a blender until smooth. (The soup can be made ahead to this point, cooled, covered, and refrigerated for several days or frozen for about 1 month. It will thicken as it cools and may need thinning with stock or water when reheating.)

Return the soup to the pan and reheat gently. Add the half-and-half, if using. Adjust the seasoning with salt and pepper. Keep warm until service.

To serve:

Ladle the soup into serving bowls. Garnish evenly, with the cheese and pumpkin or squash seeds, if desired.

Roasted Winter Squash:

About 3 pounds butternut squash (preferably 1 large squash)
Gray salt
Freshly ground black pepper
1/2 cup (1 stick) unsalted butter
2 tablespoons finely chopped fresh sage leaves
2 tablespoons granulated sugar
1/4 cup balsamic vinegar
1/4 cup dark unsulfured molasses
2 teaspoons Toasted Spice Rub (recipe follows)

Preheat the oven to 400 degrees F. Peel the squash with a vegetable peeler. Halve lengthwise, discard the seeds, then cut into 1-inch dice. Place in a large bowl and season with salt and pepper.

Heat the butter in a medium skillet over medium-high heat. When the butter ceases to foam and has turned a light brown, pull the pan off the heat and immediately add the sage, sugar, vinegar (stand back so as not to get splattered), molasses and toasted spice rub. Mix well and let simmer over medium-low heat for 1 to 2 minutes to meld the flavors.

Pour the vinegar mixture over the squash and toss well, then transfer to a heavy rimmed baking sheet or baking dish large enough to hold the squash in a single layer. Place in the oven and roast, tossing at least once, until very tender and caramelized, about 45 minutes to 1 hour. Set aside until cool enough to handle but still warm, so the liquids are runny.

Working in batches, if necessary, transfer the warm squash and all the cooking liquids to a food processor and process until smooth. Use immediately, refrigerate for up to 5 days, or freeze for up to 2 months.

Serving suggestions: Serve the puree on its own as a side dish for roast chicken, turkey, or pork; stir into polenta just before the end of cooking; use as a stuffing for ravioli; make into a soup; or use to flavor pastina. Or omit the sage, season with ground cinnamon and freshly grated nutmeg to taste, and use as a substitute for canned pumpkin in your favorite pumpkin pie recipe.

Variation for Smoky Butternut Squash: Cook the prepared squash on a baking sheet in a covered grill with soaked chips to give a slightly smoky taste. Substitute in any of the recipes that call for roasted squash. If cooking kabocha, acorn, or other difficult-to-peel squash, cut in half, scoop out the seeds, and rub the insides and cut edges with the vinegar/molasses mixture. Place on a baking sheet, cut sides up, and roast at 400 degrees F until tender. Scoop out and puree.

Yield: about 2 cups puree

Toasted Spice Rub:

1/4 cup fennel seeds
1 TBSP coriander seeds
1 TBSP peppercorns
1 1/2 tsp red pepper flakes
1/4 cup (1-ounce) pure California chili powder
2 TBSP kosher salt
2 TBSP ground cinnamon

Toast the fennel seeds, coriander seeds, and peppercorns in a small, heavy pan over medium heat. When the fennel turns light brown, work quickly. Turn on the exhaust fan, add the red pepper flakes, and toss, toss, toss, always under the fan. Immediately turn the spice mixture out onto a plate to cool.

Put mixture into a blender with the chili powder, salt, and cinnamon and blend until the spices are evenly ground. If you have a small spice mill or a coffee grinder dedicated to grinding spices, grind only the fennel, coriander, pepper, and chili flakes. Pour into a bowl and toss with the remaining ingredients. Keep the spice mix in a glass jar in a cool, dry place, or freeze.

Chef's notes: Toasting freshens spices, releases their oils, and makes them more fragrant, as well as adding a new dimension of flavor.

Taste your chili powder before adding and, if spicy and hot, cut back the amount. California chilies are almost sweet, not hot.

Tuesday, November 8, 2011

German Potato Salad


Here's my version of Kuby's Sausage House's classic German potato salad and is the perfect accompaniment to the meatloaf recipe I previously posted.  Serve with some seasoned sauerkraut and you have yourself a fabulous home cooked German feast.  I do love me some Kuby's!


3 cups thinly sliced peeled potatoes
6 - 8 slices bacon
1 onion, diced
1 bunch green onions, sliced
3/4 cup white vinegar, or to taste, I like it more vinegary
2 TBSP water
3 TBSP white sugar
1 tsp salt
1/8 tsp ground black pepper
2 TBSP chopped fresh parsley


Place the potatoes into a pot, and fill with enough water to cover. Bring to a boil, and cook for about 10 minutes, or until easily pierced with a fork. Drain, and set aside to cool.

Place the bacon in a large deep skillet over medium-high heat. Fry until browned and crisp, turning as needed. Remove from the pan and set aside.

Add onion to the bacon grease, and cook over medium heat until browned. Add the vinegar, water, sugar, salt and pepper to the pan. Bring to a boil, then add the potatoes and parsley. Crumble in half of the bacon. Heat through, then transfer to a serving dish. Crumble the remaining bacon over the top, and serve warm.


Not Your Typical Meatloaf


If you live in Dallas you have to know about Kuby's Sausage House in Snider Plaza.  I particularly love their meatloaf with brown gravy, seasoned sauerkraut, German potato salad and their marinated cucumbers.  As I've stated before, one of my biggest passions is food and everything that goes into creating a meal.  I started researching recipes to figure out the best combination of flavors to re-create some of Kuby's signature dishes.  


I don't like my meatloaf with ketchup and tomatoes or it tasting sweet at all, which is why I like Kuby's version so much.  I substituted brown gravy for the ketchup called for in most recipes.  I cooked one of the loaves in a big loaf pan and a couple others in little, single-serving loaf pans.  When cooking again I will do individual servings as they seemed to turn out better than the one in the bigger pan and of course, the smaller ones cooked quicker.  Top each serving with extra brown gravy and I recommend serving with warm German potato salad (recipe to follow).


1 (1 1/2 ounce) slice white bread, or dried Italian bread crumbs
2 TBSP milk
1 1/2 cups prepared "McCormick's Classic Brown Gravy" or 1/2 cup ketchup, divided
1 lb ground beef, extra lean
1 lb lean ground veal
1 lb lean ground pork
1 cup chopped onion
2 garlic cloves, minced

1/2 cup chopped fresh parsley
1 TBSP Dijon mustard
2 tsp dried basil
2 tsp Worcestershire 

1 tsp celery seed
salt and pepper to taste
2 large egg whites
Cooking spray

Preheat oven to 350 degrees.


If not using already dried bread crumbs, place bread in a food processor; pulse 10 times or until coarse breadcrumbs measure 1 1/2 cups.


Combine breadcrumbs and milk in a large bowl; let stand for 5 minutes. Add 1/2 cup of brown gravy (or 2 -3 TBSP ketchup) and remaining ingredients except cooking spray.


Shape meat mixture into a 9 x 5-inch loaf pan placed on a broiler pan coated with cooking spray. Spread remaining 6 tablespoons brown gravy or ketchup over top of meat loaf. Bake at 350° for 1 hour or until a thermometer registers 160°. Let stand for 10 minutes. Cut the loaf into 12 slices.  Serve with brown gravy.


Monday, November 7, 2011

Bacon, Egg and Toast Cups


Here's a recipe from Martha Stewart's Everyday Food, September 2010, that looked too good to resist.


Try cooked, crumbled sausage in place of bacon or make a vegetarian version with sauteed spinach. Dress things up with a sprinkle of Parmesan cheese.

4 TBSP butter, melted
8 slices white or whole-wheat sandwich bread
6 slices bacon
6 large eggs
1/2 cup shredded cheddar cheese
Coarse salt and ground pepper

Preheat oven to 375 degrees. Butter 6 standard muffin cups. With a rolling pin, flatten bread slices slightly and, with a 4 1/4-inch cookie cutter, cut into 8 rounds. Cut each round in half, then press 2 halves into each muffin cup, overlapping slightly and making sure bread comes up to edge of cup. Use extra bread to patch any gaps. Brush bread with remaining butter.  Toast in the oven for a minute or two.

In a large skillet, cook bacon over medium, until almost crisp, 4 minutes, flipping once. (It will continue to cook in the oven.) Lay 1 bacon slice in each bread cup, add 1 TBSP cheese and crack an egg over each. Season with salt and pepper. Bake until egg whites are just set, 20 to 25 minutes. Run a small knife around cups to loosen toasts. Serve immediately.

Cook's Note:

Standard muffin pans come in 6 or 12 cup size; if baking 6 items in a 12-cup pan, leave empty space in between. Nonstick pans are nice but not essential. Beware of very thin pans, which often lead to burning. Place pans on a baking sheet to make them easier to get in and out of the oven.

Saturday, November 5, 2011

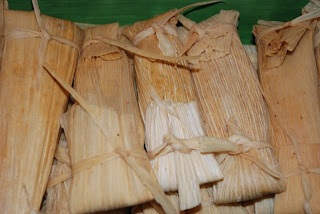
Authentic Tamales


I've been wanting to make tamales for quite awhile now and after researching through dozens of recipes, I combined a few and was very pleased with the end result.  I do have a few tips to share that are crucial to making the perfect tamales.


I learned the hard way that the key to making good tamales is to spread the masa or dough very thinly on the husk. I find it to be highly disappointing when tamales have too much steamed masa surrounding them and with hardly any filling inside.  The filling should most definitely dominate the masa.

The more the merrier when it comes to making tamales. They are certainly labor intensive, but very rewarding and therapeutic to prepare.  
Plan on at least two days for preperations.  This is a great family project for a rainy weekend. 

You can mix the beef and pork for the tamales, but if you’re a purist like me, go with one or the other.  My favorite tamales are made with pork. 


With a few minor kinks to iron out, my tamales did not disappoint.  The filling especially can not get any better.  I made sure to use enough chili powder for the masa to add a nice kick...definitely recommended.  I made about 30 tamales, half of which we steamed and the other half we froze, which will make for an easy snack or dinner.  I serve my tamales with Sriracha and sour cream.  Mucho delicioso!!

Day 1:


3 lbs pork/beef butt or shoulder
1 - 48 oz chicken broth for pork, or use beef broth for beef tamales
1 - 26 oz chicken cooking stock for pork, or use beef stock for beef tamales
1 white onion cut into chunks
4 bay leaves
8 - 12 peppercorns
4 garlic cloves, smashed
1 tsp chili powder
1 package corn husks

Cook meat (pork or beef, or both in separate pots) in a large pot of broth and stock; add enough water to cover the meat.  Add onion, garlic cloves, bay leaves, peppercorns and chili powder, salt and pepper to taste.  Bring to a boil and then reduce to medium-low and cook low and slow for the day, 4 hours minimum. The more broth you can generate from the meat, the better.

After the meat is cooked so that it falls apart and shreds easily, remove from pot, set aside to cool; remove the bay leaves.  Puree the onion, garlic and peppercorns with the broth. Season broth mixture to taste with chili powder and salt.

Shred meat finely with two forks and store covered in refrigerator separately from broth.

Soak corn husks in water overnight.

Day 2:

Corn Husks

Shredded meat
Cooking broth
Chili powder, divided use
1 - 2 tsp cumin (optional)
Salt, to taste, divided use
2 cups of masa harina (meal)
1/2 cup of shortening or lard


Rinse and clean corn husks thoroughly. Drain well and pat dry.

Season shredded meat with chili powder, salt, and cumin (optional) to taste. As you season the meat, add a small amount of broth to moisten meat, but it should not be runny; set aside.

In a large bowl mix 2 cups of masa harina (meal), 1/2 cup of shortening or lard, 1 tsp of salt, and enough chili powder to make a pink dough. Add broth mixture a little at a time to masa and mix with your hands to get a smooth, spreadable consistency. If you run out of broth, you can use hot water or store-bought broth.

To assemble the tamales, spread masa about 1/8 inch thick on corn husk with fingers, leaving about 1/2 inch border along the sides and 2 inch border along the top and bottom of husk. Use about 2 TBSP of the seasoned, shredded meat to fill the tamale like a cigar. Fold sides until they just overlap, fold narrow end under, and place tamale folded side down. Tear thin strips of the corn husks to tie a little belt around each tamal to keep it secure.  This makes each tamale a little gift to be opened.

To cook the tamales, steam for 1 - 1/2 hours or until masa is no longer sticky.  Replenish the liquid in the steamer with the reserved cooking broth as needed while steaming.

Store the remaining tamales in your freezer. Steam frozen tamales for 2 - 2 1/2 hours.

Sunday, October 23, 2011

Bagels with Lox and Cream Cheese


This is a super easy breakfast or lunch and a great crowd pleaser.  It's nice because you can serve this buffet style with all the fixings and let everyone prepare their bagels to their liking.  If you don't want to go to the extreme of making homemade Gravlax you can typically find lox next to the meat and seafood department in your grocery store.


Bagels
Cream cheese
Red onion, sliced thin
Roma tomatoes, sliced thin
Gravlax AKA Lox or smoked salmon, sliced thin
Black Pepper
Capers
Caper and parsley cream cheese spread (recipe to follow) (optional)
Dilled cucumbers (optional)

Slice the bagels down the middle.  Toast the bagels slightly on each side...not too toasted because you want them still soft on the inside.  Spread the cream cheese on top of your bagel slice to your liking. I like about 1.5 - 2 TBSP per bagel side. Add slices of smoked salmon or lox gets piled on top of the cream cheese.  Top with a combination of tomato, onion and dilled cucumber slices if you so desire. Grind fresh pepper on top and then sprinkle with capers if you like them.


Caper and Parsley Cream Cheese Spread:

3/4 cup cream cheese, at room temperature
1 tablespoon chopped capers
1 tablespoon chopped parsley
1 teaspoon lemon juice
1/2 teaspoon salt
1/2 teaspoon white pepper

Make a spread by placing the cream cheese, capers, parsley, lemon juice, salt, and pepper in a small bowl and mix to combine. 

Dilled Cucumbers:

1 cucumber, peeled, split lengthwise, seeded, and thinly sliced
1 tablespoon white wine vinegar
1 teaspoon sugar
1 teaspoon chopped fresh dill
1/2 teaspoon salt

Combine all ingredients in a small bowl and marinate in the refrigerator for 1 hour.