Pho - Vietnamese Soup

Pho - Vietnamese Soup
One of our favorite dishes - Pho

Wednesday, January 27, 2021

Burnt Ends From Live Coals


We received a rather lovely and different Christmas goody from our friends at Benchmark Title Company, and I couldn't wait to share this because I look forward to passing on the love with this unique gift idea.  Check out Live Coals.  They specialize in smoked meats, from turkeys, to ribs, to pork butt, brisket, etc...  The amazingly fabulous gift we received was a treat called Burnt Ends, which is affectionately known as "meat candy" and it is just as the name describes.  They are big chunks of beef that have fat marbled throughout each delectable chunk and with the smokey flavor it reminded me of beef jerky but in big flavor-packed chunks.  The barbecue sauce is tangy, smokey, with a little kick and it complimented the burnt ends perfectly.  I'm a sucker for dill pickles, and the homemade pickles that were included in the gift were some of the best I've ever had.  They're marinated in dill, garlic, bay leaves, etc... and are sour in the most delightful way and would be the ultimate topper to a Bloody Mary.  Live Coals caters and you might even still have time to order the most flavorful smoked meats for Super Bowl Sunday.  Perfect gift for the carnivore in your life!

Tuesday, January 26, 2021

Chicken, Spinach and Gruyere Turnovers


I saw these beautiful turnovers on my Instagram feed and couldn't wait to give them a try.  I was hesitant because I didn't have all of the ingredients on hand, but I went for it anyway and I was beyond pleased with the outcome.  Instead of cooking the chicken as directed in the recipe, I used some leftover chicken breast, or a store bought rotisserie chicken would work in a pinch too.  I substituted mozzarella for the gruyere cheese and that worked fine and gave the desired melty effect.  Also, I didn't have puff pastry so I used about 4 - 5 sheets of fillo dough that I cut to size and that worked like a charm.  In fact, fillo might be better because it had the lightest, crunchy texture that was the crowning touch to the hot, savory filling inside.  The perfect condiment to these pockets of fabulousness is a good, grainy mustard that add extra pops of flavor.

Another benefit to this recipe, and something I will definitely do for future road trips, is they can be assembled and frozen for up to two months. After crimping the turnovers’ edges, place them on a baking sheet in a single layer and freeze for at least 2 hours. Once frozen, stack them in a sealable plastic bag. To cook, brush them with a beaten egg and bake for 25 to 28 minutes.


2 small skinless, boneless chicken breasts, about 3/4 lb. (375 g) total weight, or 1 1/2 cups (9 oz./280 g) shredded rotisserie chicken

1 Tbs. olive oil

2 Tbs. chopped shallots (or green onion)

4 cloves of garlic, minced

1/2 lb. (250 g) fresh spinach leaves, tough stems removed

Kosher salt and freshly ground pepper

2 Tbs. heavy cream (or half-n-half)

All-purpose flour for rolling

2 sheets frozen puff pastry (one 17 oz./530 g package), thawed

2 Tbs. butter, melted

1 large egg, lightly beaten

1/4 lb. (125 g) Gruyère cheese, shredded

Dijon mustard for serving


If using chicken breasts, place them in a saucepan with cold water to cover by 1 inch (2.5 cm) and 1/2 tsp. salt. Bring to a boil over high heat, reduce the heat to medium-low, and simmer until the chicken is opaque throughout, about 18 minutes. Drain and let cool. When cool enough to handle, shred the chicken. Set aside.

Preheat an oven to 400°F (200°C). Line a baking sheet with parchment paper.

In a fry pan over medium-high heat, warm the olive oil. Add the shallots and garlic and sauté until soft, about 2 minutes. Add the spinach, season with salt and pepper, and sauté just until wilted, about 3 minutes. Stir in the cream and cook just until combined, about 1 minute.

On a floured work surface, cut the puff pastry sheets in half to make 4 rectangles.  Brush lightly with melted butter.  Brush just the edges with the egg. Pile the cooked chicken, spinach, and cheese on half of each of the rectangles, leaving a 1/2-inch (12-mm) border. Fold the uncovered half of each rectangle over to cover the lower half. Crimp the edges with the tines of a fork. Using the tip of a sharp knife, cut a few small slits in the top of each turnover. Brush the tops with egg and place on the prepared baking sheet. Bake until golden brown, 22 to 24 minutes. Let cool slightly and serve with mustard on the side. Serves 4.


 **This recipe is adapted from William Sonoma


Saturday, January 23, 2021

Sopa de Lima (Yucatán-style Chicken-Lime Soup)


I saw a version of this recipe posted in the Dallas Morning News the other day and being-as-how it's been gray and rainy here, this sounded like the perfect go-to recipe for a cold, winter's day.  I learned that Sopa de Lima, a light, bright, chicken-and-lime soup, is popular up and down the Yucatán.  This dish is similar to our favorite tortilla soup recipe, although the spices and herbs added like, cinnamon stick, cloves, all-spice, and oregano add a different depth of flavor than the traditional tortilla soup.  I love the idea of charring some of the vegetables before adding them to the soup, as that gives it a bold, distinct, but not too overpowering charred flavor.  Usually when beginning any soup using chicken, I will roast a whole chicken and will use the carcass to make the broth because the bones add an additional layer of delicious, healthy flavor.  In addition, I will add almost every vegetable I can get my hands on.  That will always include a roughly chopped onion,  carrots, celery, garlic, a dozen whole peppercorns.  Depending upon the spices that are required for a recipe, I will add them in this process as well.  So, for this dish, I added just a touch of cinnamon, clove, allspice and a leafy stem of cilantro. There's nothing better than homemade broth, but to speed up the process you can substitute with canned or boxed broth.  Also, you can simplify things by using a store bought rotisserie chicken, or any leftover chicken you have on hand.  With all the good vitamin C this soup has to offer, this recipe is sure to cure anything that ails you.  Buen provecho!


For the broth:

One 3-pound chicken, quartered (or two whole legs and two bone-in breasts, about 3 pounds)

10 cups chicken broth

1 large white onion, halved

8 garlic cloves (4 peeled, 4 unpeeled)

2 dried bay leaves

4 whole cloves or 1/4 teaspoon ground clove

8 allspice berries or 1/4 teaspoon ground allspice

2 cinnamon sticks or 1/2 teaspoon ground cinnamon

1 leafy stem of cilantro

15 whole black peppercorns

1/2 teaspoon dried Mexican oregano

1/2 teaspoon cumin (optional) I leave this out as my family doesn't like cumin


For the soup:

2 roma or plum tomatoes, halved

1 small green bell pepper, seeded and finely chopped

1 cup chopped cilantro, divided

Pinch cayenne

2 teaspoons lime zest

1/4 cup lime juice

Kosher salt to taste

Black pepper to taste


For the garnish plate:

1/2 cup (4 ounces) shredded Monterrey Jack

2 jalapeños, seeded and diced

1 avocado, pitted, peeled, and cubed

1 cup of cilantro leaves

1 lime, cut into slices

Tortilla Strips (recipe follows)


Place the chicken, half of the onion, the 4 peeled garlic cloves, bay leaves, cloves, cinnamon stick, peppercorns and oregano, cover with the broth in a large pot. Bring to a boil over high heat. Reduce heat to medium and gently simmer until the chicken pieces are cooked through, about 7 to 10 minutes for the breasts and 15 to 18 minutes for the legs and thighs. The meat should separate from the end of the leg bone when cooked, and an instant-read thermometer will read at least 165 F when inserted into the thickest part of the thigh or breast.

When the chicken is cooked, remove it from the pot, let it cool enough to handle, then remove the chicken skin and discard. Using your hands, shred all the meat and discard the bones and vegetables. Set the meat aside. Strain the broth and reserve.

Meanwhile, char the remaining unpeeled garlic and halved tomatoes (cut-side down) in a cast-iron, heavy-bottomed pan over high heat until blackened, about 4 to 6 minutes. Remove from the heat and let cool. Peel the garlic and finely chop them; finely chop the tomato halves and the remaining onion as well.

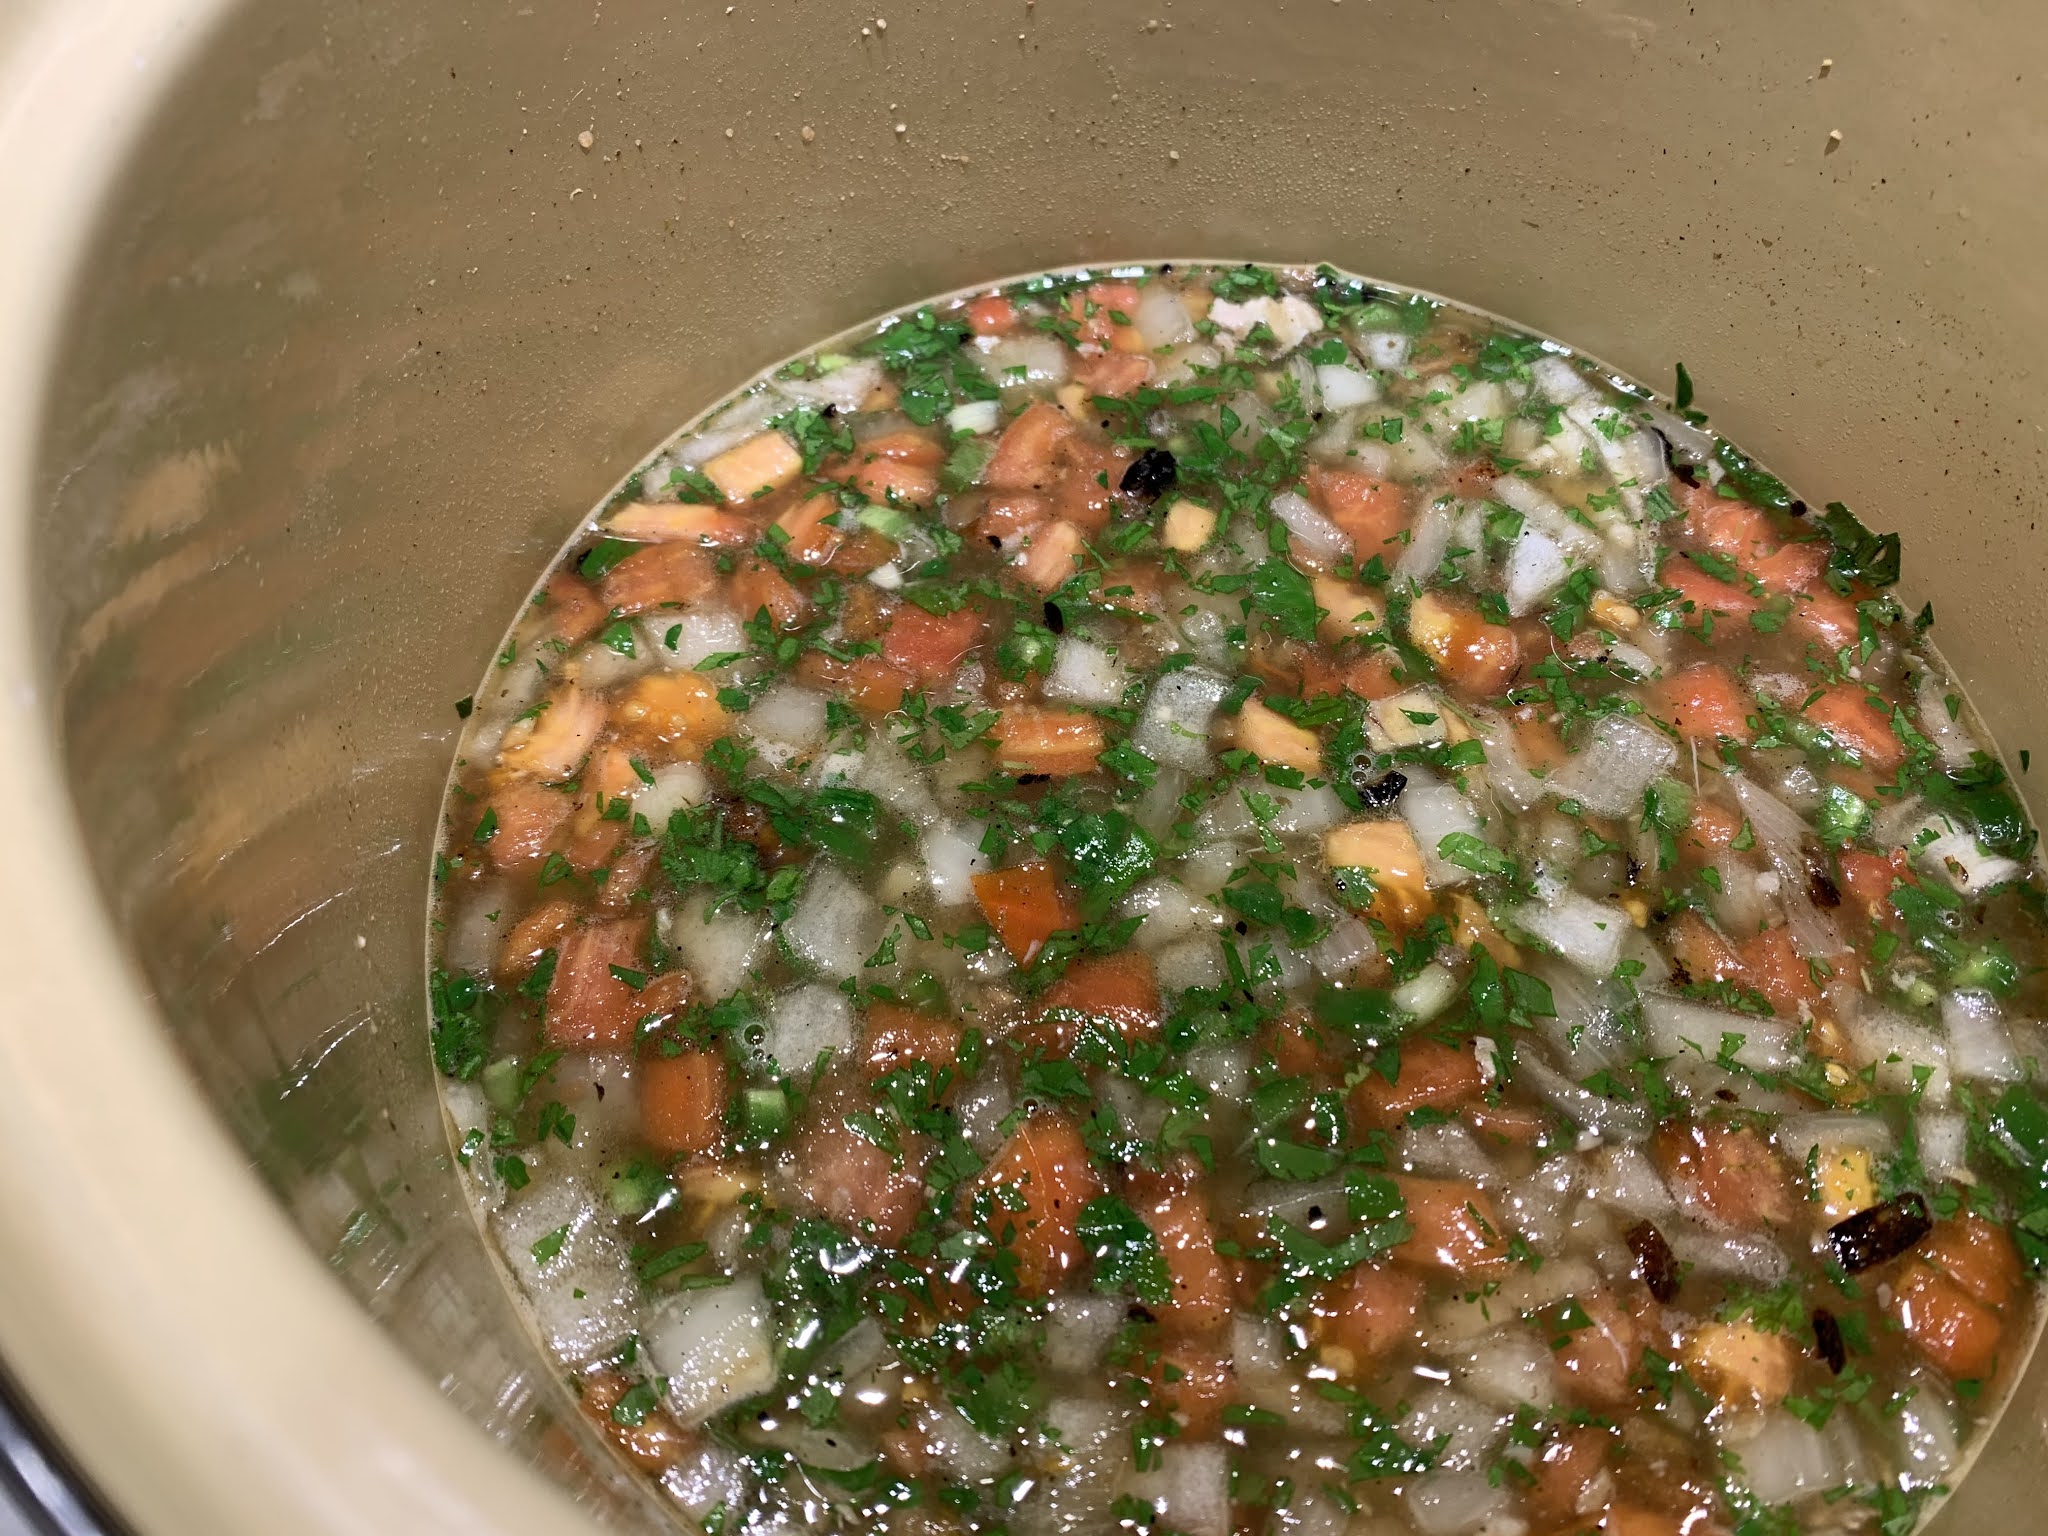
Wipe out the soup pot, then place it over medium-high heat. Add the chopped tomato, onion and garlic, along with the bell pepper. Cook, stirring frequently, for 3 to 5 minutes, until the vegetables are tender but not browned. Add the reserved strained broth and bring to a gentle simmer.

Add the lime zest, juice, the shredded chicken and the cilantro to the soup and stir to combine. Taste and adjust seasoning, adding salt and pepper, if necessary. 

Serve hot with a garnish plate, consisting of cheese, jalapeños, avocado, cilantro leaves, tortilla strips and lime wedges.  Enjoy!! 


Tortilla Strips: 

To make the tortilla strips, warm 1/4 cup vegetable or canola oil in a frying pan over medium heat. When it is hot, add 4 small corn tortillas, sliced into strips, and fry for 3 minutes, stirring frequently, until the tortilla strips are mostly crisp all over. Transfer the strips to a plate lined with paper towel to drain. Season with salt. 

Repeat to make another batch or two.


**This recipe is adapted from The Chicken Soup Manifesto by Jenn Louis


Thursday, January 7, 2021

Sous Vide Cowboy Steak


I'm so excited to share another sous vide recipe with you and this way to prepare steak is my most favorite sous vide recipe we've tried so far.  After many years of experimentation, David (our notorious grill master) has perfected the best, most mouth watering, melt-in-your-mouth delicious cowboy steak, rivaling any 5 star restaurant...Prepared sous vide style and finished with a pan sear to ensure a nice golden-brown crust.  A cowboy steak is a thick (2 ½”-3”) bone-in ribeye cut between the ribs, and feeds 1-2 easily and is one of our favorite cuts of beef.  It's savory and richly marbled so as to guarantee sheer bliss with every bite, although most any other cut of beef would work with minor adjustments on your sous vide cooking time, depending upon the thickness of the cut of meat (see chart below).  Happy sous vide-ing everyone!


1 cowboy steak 2-1/2 pounds and 1-3/4 to 2 inches thick, bone-in of 6-8-inches long (we always prefer bone-in)

1/2 stick Butter

Kosher salt and freshly ground black pepper

1 tablespoon fresh tarragon leaves (or thyme)

4 cloves of garlic, chopped fine

1 - 2 fresh rosemary sprigs

1 - 2 tablespoon olive oil,  (if pan-searing)


Set Up the Sous Vide:

Fill a large water-proof container with water, place the sous vide inside, and preheat it to the desired temperature.  Rare: 120°F, Medium Rare: 131°F, Medium135°F. Refer to the chart in the post for more temperature options.


Season the Cowboy Steak:

Mix the butter with tarragon leaves, garlic, salt and pepper.  Slather steak with mixture on both sides of steak.  Wrap a folded pad of paper towel around the end-tip of the steak bone, securing it in place with string.  This will cushion the sharp bone from piercing the vacuum bag. 

Place the steak into the bag and add the fresh rosemary sprigs.  Remove the air and seal the bag. Place it into the water bath and cook according to the desired doneness temperature (refer to the chart below in the notes).


To Finish-Sear the Steak on the Stovetop (our preferred method):

Open your doors and windows and turn on the stove vent. 

Heat a cast-iron pan (the flat one without sides) set over high heat for 5 minutes or until it is smoking hot.  Meanwhile, remove the vacuum bag from the sous vide cooker and transfer the steak to a platter. 

Remove the rosemary sprigs.  Pat both sides of the steak with paper towels to remove the moisture.  Brush a little olive oil on both sides of the steak.  

Place the steak directly on the pan.  Sear the steak for 30 seconds then flip to the other side.  Repeat the sear-flipping every 30 seconds until the steak develops a deep brown sear.   Do not sear longer than 1-1/2 minutes. Transfer to a cutting board and slice into servings. Serve immediately.


To Finish Sear the Cowboy Steak on the Charcoal Grill:

Fill and light a charcoal chimney with briquettes. When the top charcoals are white and ready, tip them into the grill basin and spread them evenly in one layer. Adjust the grate to about 4-inches above the briquettes.  Close the grill lid and heat the grill for 5 minutes.

When most of the charcoal briquettes have turned white and they are no longer smoking, remove the vacuum bag from the sous vide cooker and transfer the steak to a platter.  Pat both sides of the steak with paper towels to remove the moisture. 

Open the grill cover and place the steak on the grill.  Cook for 1-1/2 minutes, total, flipping the steak every 15-30 seconds until a rich, deep crust has formed. Use the long bone and/or tongs to turn the steak. Do not sear more than 1-1/2 minutes.

Transfer the steak to a cutting board, slice into servings and serve immediately.  


To Finish Sear the Cowboy Steak on a Gas Grill:

Set half the burners on a gas grill to the highest heat setting, cover, and preheat for 10 minutes. Clean and oil grilling grate.

Pat both sides of the steak with paper towels to remove the moisture. 

Open the grill cover and place the steak on the grill.  Cook for 1-1/2 minutes, total, flipping the steak every 15-30 seconds until a rich, deep crust has formed.  Do not sear longer than 1-1/2 minutes. Transfer to a cutting board slice for serving. Serve immediately.


Notes:

Wrap the end of the bone with a cushion of paper towel to prevent the sharp end from puncturing the vacuum bag.

When adding the steak to the vacuum bag, first fold the top of the bag over making a cuff of about 4-5 inches, add the steak, flip the top back up and seal. This will keep the bag clean and give a good seal.

A trick we learned, is that you can use Ziploc freezer bags if you don't have a vacuum sealer.  To ensure you get most of the air out, place the meat or veggie in the bag, submerge the open bag slowly in a pot of water.  As you do that the air is forced out by the pressure of the water.  Seal the bag when the water is almost reaches the top of the bag, not allowing water in.

To get a rich crisp crust quickly, blot the steak with paper towel to remove moisture before adding it to the grill or pan.

Adding a dollop of butter to the steak at the end of searing or grilling will add additional flavor and richness. 


Sous Vide Cooking Times:

1-inch thick = 1 hour
1-1/2 inch thick = 1-1/2 hours
2 inches thick = 2 hours

**Recipe adapted from Savor the Best

Tuesday, January 5, 2021

Our Loveliest Layla Love


It has been a rough couple of days in our home as our beautiful, black lab, Layla fell severely ill.  After a few days at the Emergency Pet Hospital it is with immense sadness that her diagnosis was ultimately liver cancer.  Our very empathetic and kind vet in charge explained the options to us, which were only two.  One being, they would refer us to a doggy Oncologist to come up with a chemotherapy game plan, which Layla may or may not even qualify for because of her current state of illness.  The doctor explained to us that every dog is different and there are no guarantees the chemo will improve her quality of life, and could quite possibly make her sicker, not to mention, the suffering involved with such an intense treatment like chemotherapy.  David and I had to make the very painful decision to end her suffering.  We then had to make the heart wrenching process of letting our kids, Avery, Cassidy and Dylan know the very sad news.  Due to Covid restrictions, we were only able to visit her two at a time to say our heartfelt good-byes, masked no less, to our very sleepy and lethargic pup.  Our girls live very close by and were able to get there within minutes of our calls to them.  Dylan is currently skiing in Colorado and was heartbroken that he wouldn't be able to say good-bye in person.  While the girls were at the hospital with Layla, in a secluded little room, they were able to face time with Dylan and he too was able to say his good-byes to our Loveliest Love.  Then, it was David's and my turn.  After allowing the girls a little time, David and I arrived to be with her until the very end.  When we got into the car at 8pm at night, the Grateful Dead station was playing the Dead's song "She's Gone."  Of course that was another cry fest all the way to the hospital.  When we arrived, they were very busy and we had to wait outside.  Again, due to Covid, only  family members  of their patients who are having to put their pets "down" are allowed in the hospital.  We were ushered into the cold, small room with a big, cozy doggie bed, two chairs, plenty of tissue and our Layla laying on the cold, tile floor in the corner.   She had a blanket by her side, eyes closed, looking very skinny and sad, barely acknowledging us until I said, "Hi Birdie!"  With barely open eyes she looked at us with as much energy as she could muster.  Then slowly placed her head back down on the cold floor and closed those beautiful golden, brown eyes of her's.  It was heartbreaking.  Thank God, our girls were still there and they allowed us all to be with our beloved Layla...together, one last time, for a very brief time.  Then came the dreaded time of ringing the bell to let the doctor know we were "ready."   The doctor was as comforting as she could be while explaining the process that was about to occur.  They had an IV attached to Layla just above her right paw.  The first dose was to be propofol...yes, the very drug Michael Jackson died from.  As explained to us would cause a few moments of euphoria and then would quickly induce sleep.  Then was followed by a strong depressant that would slow her heart until she passes on.  It was very quick.  Once the propofol was injected into the IV she lifted her head, looked more alert than we had seen her in days.  She looked and saw David and me with our masked faces, but I know she knew it was us.  Then her head was back on the cold floor as the final dose was being administered.  It didn't take a minute before the doctor listened for our Layla's heartbeat to declare there wasn't one and that our beloved Layla had left us.  We left the ER, without our girly....it was almost more than I could bear as I went sobbing to the car....seeing all the other parent's of fellow furry patients in their cars, waiting for their baby's diagnoses.  We got home and our other beautiful, blonde lab, Ryder was anxiously awaiting our arrival and she was already sensing the horrible sorrow and the absence of her sister.  Whenever David and I would hug to console each other, she would run over to us and insert herself in between our legs, as if we were doing a group hug.  It is very clear she needs as much soothing, love and comfort as the rest of us.  Today, the day after, Ryder was laying next to David as he was working, it was right where Layla spent most of her time in her final days at home.  Ryder licked that area clean where Layla's essence was, like she was trying to grasp all that she could of her.  That too was heart wrenching. 

The impact of Layla's loss is immense.  But the time we were able to share with our "Birdie" is a blessing we will forever treasure.  Layla truly is an angel in heaven...one who will live in our hearts forever!!  RIP my Loveliest Layla Love!!  xo


**This video was made possible by my sweet husband, David.  He deserves all the credit.  He posted our tribute video with the following eulogy on Facebook:

Last night, we lost our beautiful black lab, Layla to liver cancer.  She was the sweetest, most loving dog and we called her, among other things, the Lovliest Love.  She loved to swim, to sleep belly up, to eat a stick of butter when we let our guard down or even a dozen and a half chocolate chip cookies at a sitting.  She loved to bark at the neighbor kids through the fence, but was the sweetest thing.  There was nothing like a good dirty sock or some drywall on our wall to make her happy.  Layla, you will be forever missed, but we are forever grateful to have had you in our lives!


***Here's Dylan's tribute via Instagram, equally beautiful and eloquent:

Today we lost the sweetest angel, our dog Layla. She brought unbelievable amounts of love, joy, and happiness to me, my family and those that knew her. I’ll miss her always being my friend when I would go down stairs for a 3 AM munch, when she would come into my room during a storm because that’s where she felt safe, stealing as much food off the table/counter she could get for the few seconds we wouldn’t be looking, and jumping into the pool and having absolutely no shame coming in through the doggy door and running throughout the house soaking wet. Wherever you’re going, just know you’re safe and I know you’ll be happy. You’re gonna have endless pools to play in, and all the food you can steal. I’m so sorry I couldn’t be there to hug you goodbye for the last time, but i’ll cherish the last time I got to hold you for the rest of my life. I will miss you and your goofball-ness forever, and so will Ryder, Avery, Cassi, and Mom and Dad. We love you Layla, and we will miss you. Fly High Birdie.


Oh No!!  I wonder who did that??


Sunday, January 3, 2021

Kale Salad


Happy New Year to all of my fellow foodies!!!  I know it is such an understatement to even say this, but we are all so very relieved to finally put 2020 behind us.  It was a quiet New Years for David and me....and as a good friend so eloquently said, "Awwww gone are the good 'ol days when we used to stay home New Years Eve because we're old and tired."   We plan on doing it up next year to make up for all the lost time with loved ones.  I wish you all the very best for 2021 and a delicious one at that!!!!  Good riddance 2020!!!!
In the spirit of a New Year and with all of those resolutions being embraced, I thought I would post a healthy recipe that has ended up being one of our family's favorites.  Never being very fond of kale, I was determined to find a recipe that would be agreeable with us all.  It seems as though kale salads and soups have become quite popular over the past few years.  Avery, our oldest daughter, was telling me about the "best" kale salad she had while living in Boulder, Colorado.  I immediately googled it and I found the recipe to this zesty and spicy salad she was telling me about.  In my research I learned this recipe is from the executive chef and co-owner Steve Redzikowski’s, of The Oak restaurant in Boulder and is a hot item on their menu.  
Have you eve heard of messaging your kale?  Well, apparently that's a real thing.  As I've learned, kale is quite tough and fibrous and can be difficult to chew compared to other greens like romaine lettuce or spinach.  By massaging it for as little as 2-3 minutes with a little oil and/or lemon juice, it becomes more tender, making it easier to chew and digest.  The other reason is to infuse the kale with more flavor before the dressing is added.  
How to Massage Kale:
Add chopped kale to a large bowl and top with lemon juice and olive oil. Use clean hands to massage for about 3 minutes to soften the leaves and infuse the leaves with the oil and lemon. A pinch of salt added near the end of massaging adds even more flavor.
You’ll notice that by the end of massaging the kale gets quite glossy and is slightly reduced in volume. That’s exactly what you’re going for.  Interesting process for sure.
To change things up, I sometimes substitute the apple with sliced pear and I will use blue cheese instead of the parmesan.  Also, to make this a healthier salad, I will just add sliced almonds, bypassing the candying with sugar.  The main event in this salad dressing is shichimi togarashi or it's also known as Japanese seven-spice seasoning.  Spices includes chilies, sesame, orange, nori flakes (seaweed) and more. It will add a bit of a spicy kick, so use sparingly and I've found that if I let it sit in the olive oil for too long it can get almost too spicy.  I've not heard of togarashi before and couldn't find it in our local grocery stores, so I ended up ordering it on Amazon.  Togarashi is a great find and I'm using it, although sparingly, on most everything...from soups, to noodle dishes, grilled meats and seafood.  The possibilities are truly endless.  
Serves 2
3 tablespoons whole almonds (I use thin, sliced almonds)
1 tablespoon granulated sugar
1½ cups very thinly sliced stemmed lacinato kale (from 1 small bunch)
3 tablespoons grated Parmigian-Reggiano
3 tablespoons extra-virgin olive oil
1 tablespoon fresh lemon juice
1 teaspoon togarashi (Japanese seven-spice blend)
2 cloves of garlic finely chopped
1/2 teaspoon Worcestershire
1 small Honey Crisp apple, very thinly sliced 
Salt and pepper to taste

To make the candied almonds: 
Heat the oven to 300° F. Bring the almonds to a simmer in a small pot of water. Immediately strain the almonds, transfer them to a baking sheet (lined with a non-stick baking mat, if you have one), and dust with the sugar.
Bake, stirring after the first 10 minutes and then again after every 5 minutes, until the sugar is hard and caramelized. It should take about 30 minutes.
Let the almonds cool (they’ll crisp as they do), then cut them into quarters.

To assemble salad:
Toss the messaged kale, cheese, olive oil, lemon juice, togarashi, and apple slices together in a large bowl until well combined. Taste and season with salt, if necessary.

**This recipe is adapted from 5280.com